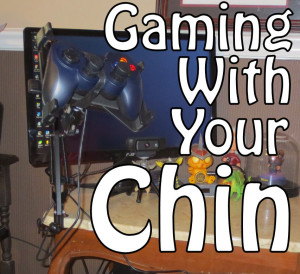
Gaming with Your Chin
Hello, Ability Powered gamers! Today, I would like to talk to you about my latest Assistive Technology setup. It helps me play games such as First Person Shooters, Platformers, and many more. With this current setup, I can now control my character using my chin. There are a few different components that I use like a Logitech Gamepad controller, a mount, a switch interface, switches, and the program JoyToKey. Let me explain how it all works.
My Controller
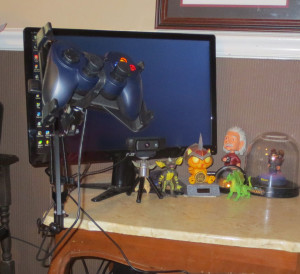
Getting started gaming with your chin will require a controller. There are a few different options for controllers. You can use an Xbox controller or a Gamepad sold for gaming on the computer. I chose the Gamepad because the thumb sticks have less resistance than the Xbox thumb sticks. I also bought some thumb grips to extend each stick a little higher you reduce the resistance needed a little bit more.
My Mount
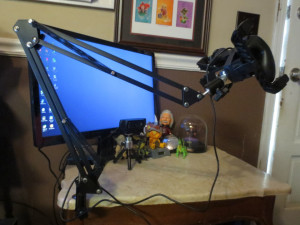
There are many different kinds of mounts available for gaming with your chin. You can purchase one that will help you put your Gamepad into a position that you need it. Some of which are very expensive, but you don’t have to go that route! There are different kinds of mounts that more or less will do the same thing as the expensive mounts. You can even make your own with this handy guide from OneSwitch that is made from a selfie stick and an articulating arm. While I was looking for articulating arms I came across something else I thought would work really well and it did! It’s the Universal Smart Phone Stand by Neewer. It is actually a mount meant to hold cell phones. With a little bit of black electrical tape, I was able to secure my Gamepad controller onto the plate for mounting. So far it has worked great!
My Switch Interface
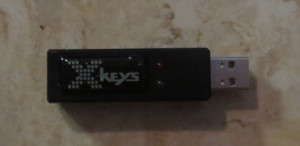
If you’re not familiar with switches or switch interfaces read my post now to learn more! If you have read it then you will know that you have to have a switch interface in order to add a switch to your computer. The switch interface I’m using is the X-keys USB Switch Interface. I chose it because it seemed fairly simple for a beginner like me to setup, and it was! You just plug it into your computer via a USB Port, connect your switch, and then assign the switch a function in the software that is included with the switch interface. Super easy to do!
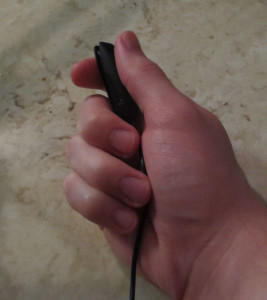
My Switch
The switch I chose to begin gaming using you chin is called the Ultra Light 1 HD Switch which comes from EnableMart and is categorized as a sensitive switch. This means it takes very little pressure to push down the button. The switch itself is small enough to fit inside my hand and takes about as much pressure as it does to click a mouse. It also has a sticky back if you want to mount it somewhere else.
JoyToKey
JoyToKey is free software you can use to turn joystick movements into keyboard presses. You can assign a thumb stick to act as the “W” key when you press it up. It can act as the “A” key when you push it to the left, etc.. You can assign any keyboard command needed in a game to the thumb sticks or to your switches if they are configured correctly. It gives you so many more choices when remapping keys.
Putting It All Together
Once you have the controller mounted you can attach the other end to a table or desk near your chair. Now you can swivel the controller around and adjust it up, down, side to side, however you need it to easily press the thumb sticks with your chin. Place your switches wherever you need them to easily pressed them. So far, I have only needed at most two. I hold one in my right hand and put one on my neckrest behind my head, so I can lean my head back whenever I need to press it.
Using Your JoyToKey
You can make multiple game profiles in JoyToKey, and configure the key presses to whatever keybinds you might need to play the game with. For example, when I play Mojang’s Minecraft I walk forward by pushing the thumb stick up. I also jump by pressing the thumb stick left and open inventory by pressing a thumb stick down. When I use an item I press the left mouse button. I can also place blocks with my right click button which is assigned to my switch.
Challenging, Yet Worthy
 I know it may sound complicated, but setting everything up was actually really easy once I learned how to do it. Huge thank you to Barry Ellis of oneswitch.org for all his aid! He helped me figure out everything I needed and how to properly set it up. Hopefully I can pass on this information to any of you guys who are interested in a gaming setup like this. I will be posting some more in-depth looks at each of the products I am using currently. If you have any more questions that I may miss in this article, please don’t hesitate to contact me! It doesn’t have to be complicated to get back into gaming! But don’t take my word for it, look out for more posts about my equipment on the Accessibility Hardware column!
Leave a Reply